Tag Archives: learning

Teaching Students Online

Standard

students_elearning-635x422

For the past several weeks, I have been designing an online course module for my Master’s Course, Teaching Students Online, at Michigan State University.  This course module is designed for second graders and is science-based with several cross-curricular activities. My course module started by brainstorming ideas, dreaming about the perfect module, evaluating different Course Management Systems (CMS), and eventually getting my content down.  Once the module was completed, it was time to revise.  You can read all about this process in my Developer Notebook, which served as my sketch pad for this online course.  Below, I’ve evaluated a few things about my Course Module, in hopes that it may benefit those who are designing their own as well.

First and foremost, let me just say that using Weebly as my CMS was great.  It has such a simple interface to use and the click and drag feature makes organizing each page very easy.  The options to embed, implement YouTube videos, including documents without a download, and the personalizing tools are just a few of my favorites from Weebly.  I knew, for my grade level, that I needed something that was very clean, step-by-step, and easy to navigate.  I also knew that it should be aesthetically pleasing with all sorts of mediums in order to hold the attention of my students.  As far as the content goes, I started with my grade level frameworks when I decided on this lesson and created my lesson objectives from there.  Students need to be aware of where they need to get to before they start.  Having those goals in mind better direct their learning.  There were several revisions that I made once I included all the content I wanted in each lesson from increasing the font size, to adding visuals, to embedding a voice recorder of myself reading the larger amounts of text.  I also have plans of including screen casts for each lesson to model to students.  It is pivotal for second graders to see the process and expected outcome.  A screen cast would not only benefit normal functioning students, but also serve as a modification for students with learning disabilities.

There were very few pitfalls during this process, if any.  As I mentioned above, Weebly made it nearly foolproof.  I believe the hardest part was adding the audio player because I had to use a different supplementary tool (a free download for Voice Recorder from the Apple App Store) to record the information, save it in the correct file format (mp3), and then upload the file to the embedded audio player itself.  This process wasn’t difficult once I figured out the file format, (I kept trying to use mp4 files rather than mp3), but instead lengthy and time consuming.

I highly recommend Weebly for an online course monitoring system.  It’s extremely simple for elementary age students, but offers enough variety for even middle school and high school students.

And now for the grand reveal *drum roll*….. You can visit my online course here.


Wicked Problem Project

Standard

wickedIt is no secret that problems exist in education.  Some of these problems are simple, others are much more complex.  Either way, a solution can most likely be determined to fix the problem.  However, wicked problems are problems that are insolvable due to the amount of variables that factor in.  The New Media Consortium identified five major problems in education that fell under the “wicked” category.  The Wicked Problem that my Think Tank and I decided to tackle was Re-imagining Online Learning.

You can find the link to our project below.  We look forward to your comments!

Re-imagining Online Learning

This image is licensed under a Creative Commons Attribution License,

Data Gets It Done

Standard

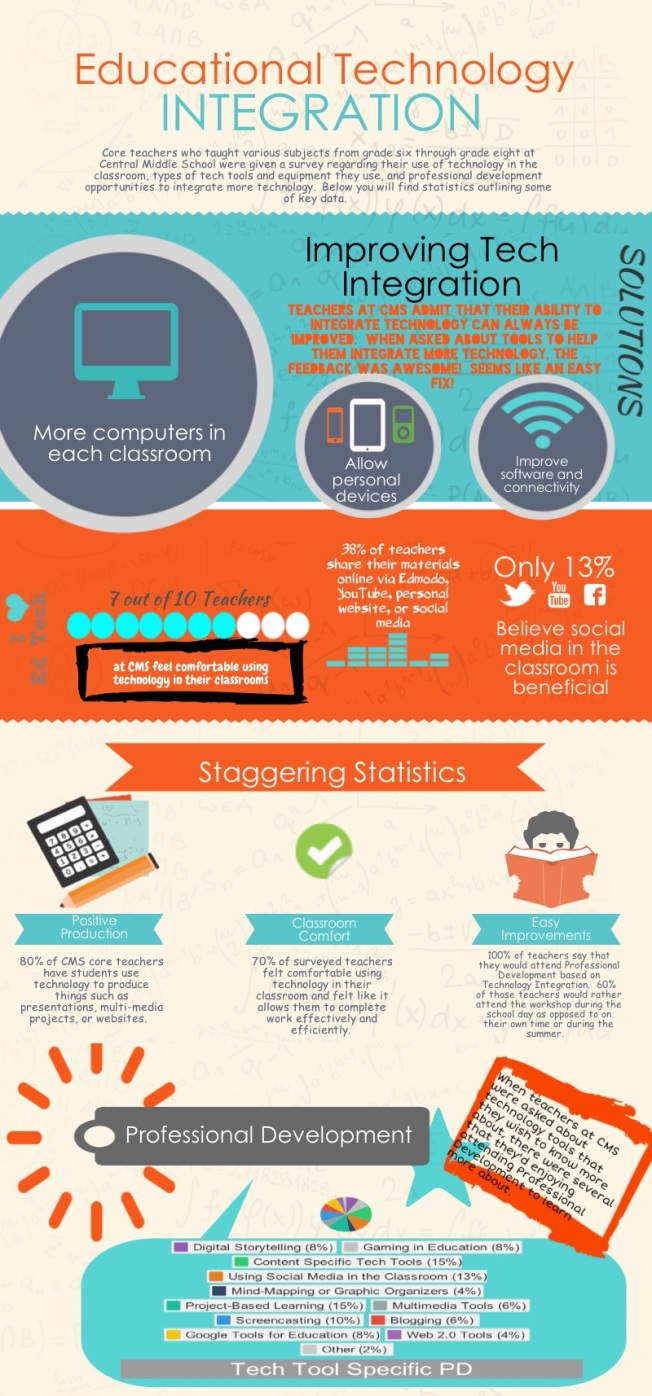
This week, the topic of discussion was technology integration in my community of practice.  I was asked to create a survey for the colleagues that I have the privilege of working alongside each and everyday in the teaching profession.  Questions were centered around types of technology used, how and how often this technology was incorporated, problems with technology in the classroom, and professional development opportunities offered for this particular subject.  I’ve summarized the data I collected which are outlined in my white paper, Technology Integration in My Community of Practice.  Also, you can find a few of the prominent statistics from the survey in the infographic below.

Unknown

Using Tech Tools To Find Solutions

Standard

Another semester has begun at Michigan State University and I was eager, nonetheless, to begin.  My first week’s assignment in CEP 812:  Applying Education Technology to Practice found me solving problems in my classroom with the use of a newfound tech tool.  In the screencast below, I’ve illustrated the details about the problem I’ve identified, demonstrated the tech tool I’ve chosen to fix it, and explained how and why this is going to help my students.

Final {CEP811} Thoughts

Standard

Sadly, this is the final week of CEP811.  As the course comes to a close and I begin reflecting back on the past weeks, I can honestly say that this class has pushed me outside of my comfort zone more so than any other course I’ve ever taken, which seems like a lot at this point!  I learned things I had never been introduced to previously, created things I didn’t think I could, and added to my educational technology toolbox by taking a variety of new resources with me for implementation in my classroom.  The course has been a roller coaster based on emotional attachment to my MaKey MaKey, frustration when things weren’t working in a particular assignment, and accomplishment at the end of the day when I overcame obstacles and barriers to achieve my goals each week.  Wow, what a ride!

After deeply engaging with Maker Education throughout the past few weeks, it is definitely something that excites me.  The innovation to curriculum that the Maker Kits themselves bring into the classroom are extraordinary.  They push the boundaries of what traditional teaching practices, classroom setups, and student work looks like within the walls of the classroom, but they also push the creativity in the mind of the teacher, me!  I do see myself using the Maker Kits in my classroom.  I have already begun the planning process for their implementation next semester based on the lesson plan I created and modified in this course.  I’m anxious to see how the students respond. With the lesson plan I created around the MaKey MaKey, it encourages creativity, collaboration, and innovative thinking, something that I think my students lack in English Language Arts.  The MaKey MaKey kit could be the spark to that creativity that some students may need to push through their traditional thinking, much like this course did for me.

In order to gage the Maker Kit implementation’s effectiveness, I will need to evaluate the process asking myself and my students a variety of questions.  Questions of such that relate to creativity, problem based learning, peer collaboration, experiential learning, and the ultimate, enjoyment and enthusiasm of the students participating.  Obviously, the first time these kits are implemented, things won’t go perfect, but based on the learning atmosphere alone, I can grasp whether or not students are learning for understanding, broadening creative thought, and engaged in meaningful exploration.  Although I honestly feel as though the Maker Kits may be more easily integrated into a Science classroom, I’ve never been about taking the easy road.  It will take lots of effort to effectively bring them into my ELA classroom, but I believe the rewards will be far greater once it is all said and done.

As I reflect back on the last few weeks for me personally, without sounding too cliche, I can honestly say that I have grown as an Ed Tech integrator and as a person.  There were times when I felt like I excelled, where things came easy to me.  Then again, there were times where I struggled, frantically trying to make my work perfect.  During times of frustration when I was challenged and things weren’t working for me, I had to evaluate my work through the process, not just the end result, and step away calling it “good”.  Like the MAET Evaluation Philosophy states “Alternatively, you may already feel quite proficient with a wide range of technologies, but are taking this course to develop your tech skills even further. Rest assured, this is also the course for you. As adult learners, we are most interested in your growth — and you will be evaluated on the basis of how far you go, not on the basis of where you started,” I feel as though I brought something to this course, but took even more away from it.  I’m a better educator and Ed Tech integrator now, than when I started.  Isn’t that what learning and success are all about?

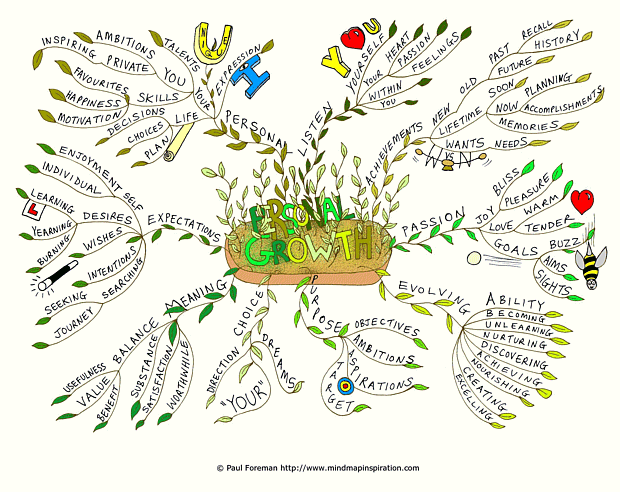
personal-growth-mind-map

Photo credit: CC By Paul Foreman, 2013 http://www.mindmapinspiration.com

Maker Experiment Revised With UDL In Mind

Standard

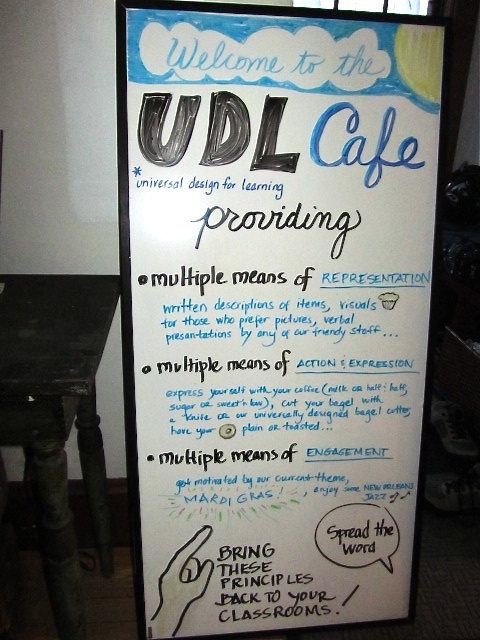
This week I am going to revise my Maker Experiment Lesson I created a few weeks ago with Universal Design Learning (UDL) in mind.  UDL is a framework for designing your lessons and curriculum in a way that allows all individuals to learn information, gain new skill sets, and build on their motivation and enthusiasm for learning, while also maintaining high achievement for all learners.  If you wish to learn more about this method of learning, check out the video clip below that gives a quick, but through explanation of UDL.

Part One:  Revised Maker Experiment Incorporating UDL

Prior to starting the Maker Project, I will need to activate prior knowledge of Letter Writing, Strong Argument Components, and Demonstrative/Procedural essays and speeches, showing strong examples and non-examples.  Students will also be given a list of resources for each.  Once this has been covered, a brief introduction to the Maker Experiment will be discussed, objectives introduced, and for students to begin thinking of their goals.  This scaffold session will be nearly a weeklong process.

I will start the Maker Project lesson by setting up a MaKey MaKey circuit that I can use to play a computer game.  During this time, I will be following a how-to essay model that I’ve created to show the students how the circuit is set up by following the directions I’ve written in detail.  These directions will be in written format for the students to follow along with me, as well as on my Prezi presentation that I’ve created to supplement the presentation and have added color, visual aids, text features for important information, etc.  As I follow the directions, I will also model how to “think aloud” showing things that are going well for me while assembling the Maker Tool, as well as problems that I encounter to show students that it is acceptable to make mistakes and turn them into a positive.  Students will also have pieces of the MaKey MaKey on their tables to serve as  a visual, as well as something for them to touch.  Pictures of the Maker Kit components will also be displayed in the Prezi.

Now that I’ve peaked the students interest I will show a few video clips of other similar MaKey MaKey creations by other kids using the MaKey MaKey website and YouTube.  By using examples, I hope to spark the creative juices of the students so that they are enthused about the project.

Once the students understand the concept of MaKey MaKey, the students will be divided into groups, for those that wish to work in a group, using a random group generator.  Those that want to work individually may do so. Each group or individual will be expected to create their own MaKey MaKey invention.  As the facilitator, I will leave the invention criteria and goals open for them to brainstorm ideas, but may make suggestions for direction as the groups begin the process, constantly keeping their goals in mind.

Once they’ve brainstormed using supplied web links and note-taking tools to create an invention, students will be able use prior knowledge and do one of three things of their choosing, 1) Business Proposal- Write a formal letter, video, a speech, etc. to a local business owner explaining the invention and how it would contribute to their business, 2) Demonstrative Outcome-Write a how-to essay, create a video, draw an illustration, etc. explaining the process of how to put together the circuit including benefits and uses, or 3) Present Your Argument- Create an argumentative essay, debate the topic with another peer, video, etc. either in favor or against, using the maker kits in other classes.  The means of completing one of the “Choose” activity is left up to the student or group.  Possibilities are endless!

The students will be expected to base their final project on prior knowledge of how each response should be set up and components included in each.  Students will be expected to share with the other groups in class and assess their own work as a group.  All students will complete a questionnaire to gage their enjoyment, learning, improvement, and thoughts of the project for future assignments.

Part Two:  Reflection

Imposing the UDL method into my previously created Maker Experiment Lesson was not as difficult as I thought going into the assignment.  Does is take more work in the beginning to plan to incorporate all the resources into a lesson as such?  It does.  But it far outweighs having to go back a re-teach, risking the fact that you may or may not have engaged all learners, and questioning whether or not enough was done for your lower learners as well as your higher ones.  The benefits of UDL are outstanding in that they help those with known disabilities, but also those with unknown learning disorders.  It incorporates student-desired outcomes that relate to teacher-desired objectives.

I was already doing quite a bit to incorporate UDL prior to the revision.  I was allowing students to set goals, collaborate, use multi-mediums, choose their outcome of the project, and presenting information in multi-modalities as well.  I didn’t take away a whole lot, but added to quite a bit.  The resources from the UDL Toolkit will definitely be listed as possible Assistive Technologies for all students to have access to rather than those with Learning Disabilities.  The revisions I did make, made my lesson that much better, as well as reaching many more learners on a deeper level.

March 4, 2011

References:

UDL At A Glance. (2010, January 6). YouTube. Retrieved December 1, 2013, from http://www.youtube.com/watch?v=bDvKnY0g6e4

Lessons Learned

Standard

When I decided to enroll in the MAET Program, I really wasn’t sure what to expect.  Even if I had formulated expectations in the back of my mind, I know CEP810 drastically exceeded them.  Technology has always been my passion.  It’s something that I enjoy, something I consider my strength, and something that excites me.  CEP810 not only taught me how to better incorporate technology into my pedagogy, but also gave me that much more confidence in my profession.

The lesson over the importance of learning versus understanding was eye-opening from the beginning.  I reevaluated my integration of technology, constantly asking myself, “Are my students learning from the technology supplemented, or are they exploring deeper understanding of the content?”.  Not only did I ask myself this question with technology integration, but in every aspect of lesson planning.

Building a stronger Professional Learning Network has been such a blessing.  I felt as though I had a solid PLN prior to this course, but the exposure with Twitter and other MAET peers is AMAZING!  An endless supply of resources and help is at my fingertips wherever I go.  I finally feel like I have access to people who share a love for educational technology just as I do.  People that are receptive to new technologies, using them in the classroom, and promoting student achievement in doing so is such an awesome feeling and outstanding group to be apart of.

CEP810 has changed my life for the better.  I know it sounds very cliche, but it’s true!  Without the Getting Things Done tools, I would be much further behind in the classroom, and in life in general.  I am constantly adding things to my Springpad, a tool that I absolutely adore and have shared with my coworkers.  It has changed my whole mindset of doing things.  I now rely on the two minute rule; if it can be done in less that two minutes, I do it! It’s amazing at how much I used to put off and how that overwhelming feeling is becoming less and less.  I have re-purposed Springpad as well for it to serve as my lesson plan folder that incorporates all resources I’ve created and uploaded, or that I’ve found via the Internet.  Never before would I have known about Springpad, or have the ability to think of it in a different way as a classroom resource.

For a technology-minded individual, I didn’t realize how my mindset affects my ability to choose meaningful technology integration and serve as a supplement to my content.  My mind was opened even more so, and my eyes see more clearly the process when choosing different technologies to enhance student success.  I am more apt to try things that I normally would not have.  I have broadened my horizons and escaped my technology teaching comfort zone.  I am equipped to fail, but even more equipped to adapt and improve after failure.  This course has given me that mindset.

TPACK (Technological Pedagogical Content Knowledge) might have been one of my very favorite projects, of all time.  I could not believe the similarities and relationship I found between TPACK and integrating technology in my classroom.  I have been looking for things to re-purpose and adapt ever since.  I’ve seen the angle that I need to be looking at, using tools for things other than what they’re meant for.  Intertwining pedagogy, content, and technology is now one principle in my classroom, rather than using each as a separate entity.

My practice has already been impacted by this course since I started in September.  I’ve implemented new resources and a new approach to tech integration.  My kiddos just recently wrote their very first blog post over a book they read.  I would not have considered this prior to this course, but have gained the backbone, knowledge, and resources available to incorporate meaningful integration.

My students are blogging for the first time thanks to CEP810!

My students are blogging for the first time thanks to CEP810!

I’ve been a forever fan of YouTube in the classroom.  Until this year, it was blocked by our server.  I now have evidence for it’s many uses and it’s ability to promote learning.  How?  I used it personally to teach myself to play the piano!  The Networked Learning Project definitely made an impact on me as a learner and the resources I choose to assist my teaching in the classroom.

Questions and/or struggles that still remain are that of the students finding, using, and implementing credible sources during a project.  It’s very difficult to have the Internet as a resource that is readily available and explaining to my students that not everything is true or valid.  Also, when they find those credible resources they need to give credit to the owner.  Creative Commons will definitely assist in this by providing resources that are licensed for use.  The Copyright and Fair Use lesson definitely explained this touchy subject in a more concrete way.  I also wonder if I will be able to create an epidemic of tech integration in my building among my peers.  I want them to catch the virus and be itching to incorporate technology in a meaningful way rather than being dismissive of something “new” or innovative.

As a person who enjoys learning, this course has re-ignited that ability and enhanced the meaning of lifelong learner for me on so many levels.  My hunger for learning is even stronger; looking at tweeted information and articles, constantly checking my RSS feed, and following new blogs are just a few items that fuel my appetite.  I’m constantly adding new popples to my Popplet created during the early weeks to visually show my PLN.  I know as I continue on this MSU journey, it’s only going to expand even more.  I can’t wait to see what tomorrow holds and the transformation I go through as I embark on this adventure!  What an amazing start CEP810!

Networked Learning: YouTube, You Are My Sunshine

Standard

Sadly, this is the final blog post involving the Networked Learning Project I began just a few short weeks ago.  For this project, I was asked to use YouTube and help forums to teach myself how to do something, play the piano.

In the video of my Networked Learning Project, you will find that using YouTube and help forums was a success!  Through lots of research, video tutorial views, and practice, I was able to put together the melody of “You Are My Sunshine”.  I started out using three different videos that I liked, but eventually narrowed it down to one.  I used a fingering chart that I came across on true-piano-lessons.com, an excellent resource.

I thoroughly enjoyed this project and will continually use the things I learned from it.   I would love for my seventh graders to carry out something very similar to the Networked Learning Project to tie in to research standards.  I will encourage my students to use this approach to learning as well, due in part to the fact that it accommodates all learning styles, provides an endless supply of resources and possibilities, and promotes well-rounded individuals who seek and love learning on their own.  Technology is part of the world we live in.  Those resources are there.  We should use them in a way that benefits and promotes personal educational growth.

I’m intrigued each time I learn something new and these resources and this approach to learning make doing so that much easier. Thank you CEP810 for teaching me something new each week, but also teaching me how to teach myself new things!

learn something new

References:

“Lesson 6: You Are My Sunshine in C, F, & G.” You Are My Sunshine For Piano: Notes & Fingerings. N.p., n.d. Web. 23 Oct. 2013. <http://www.true-piano-lessons.com/you-are-my-sunshine.html&gt;.

Piano Lesson “You Are My Sunshine”. (2011, January 19). YouTube. Retrieved October 23, 2013, from https://www.youtube.com/watch?v=CFlRGn5Ww2s

You Are My Sunshine Very Basic. (2008, October 29). YouTube. Retrieved October 23, 2013, from https://www.youtube.com/watch?v=7MGBqbq8HU0

You Are My Sunshine by http://www.EasyPianoStyles.com. (2012, February 9). YouTube. Retrieved October 23, 2013, from https://www.youtube.com/watch?v=7bf96xu8W8M

Network Learning Project Post #2

Image

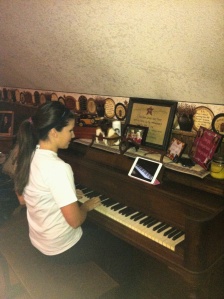
piano picAs I researched YouTube videos and help forums about playing the piano, I knew I needed to pick a song to make my learning more specific.  Once I decided on “You Are My Sunshine”, I was off and running.  I found several videos, note and finger charts, and lessons online.  I’ve started my online lessons via YouTube with some wonderful videos from three different teachers in three different videos.  I’ve decided to use all three different videos because of the level of complexity with each, the variation of progression throughout the lesson, and the scaffolding of teaching each teacher uses.  With my videos on my iPad, sitting on the music stand, I was ready to begin my YouTube piano lesson with this sentimental meaning-filled song.

I’m very pleased with my progress thus far.  I’ve learned all the chords that one video broke down for me in the key of C and the key of F.  I am currently practicing each hand separately, as instructed by the video, and mastering those first.  Once both hands have been mastered and memorized I should easily be able to put them together to play both the melodies and the harmonies of “You Are My Sunshine”.

Throughout my progress I have found many pros and cons of learning via YouTube.  One of the things I enjoy is being able to watch the outcome, pause it, complete the action myself, then continue on with the video.  I can learn at my own pace and move on once I’ve obtained mastery or continue working on parts that I am struggling on before moving on.

My biggest struggle so far is memorization.  I don’t have sheet music sitting in front of me therefore it’s much more difficult for me as a visual learner who struggles with memorization.  When I play and pause I can play one melody or one harmony line at a time perfectly, but when I reach the end of the lesson and wish to play the song in it’s entirety, I struggle.  I hope this comes with repetition, so hopefully more practice this week will help this become easier.

Overall, I’m enjoying this whole process.  I can see the progress and love being able to see it instantaneously.  Until next time, I will be playing the YouTube videos, pausing, playing the line of music, and practicing this routine over and over until I’ve reached mastery.  I hope that I can move past playing one hand at a time and move on to both hands together this week.  I’ve added my YouTube videos and websites to my Springpad Notebook for this Network Learning Project so my videos are more easily accessible, along with the notes and fingerings charts.  I can review this information even when I’m not in front of the piano via my phone and iPad.

Until next time, I will be practicing, practicing, practicing!

Network Learning Project: Playing the Piano

Standard
Photo Credits:  Chelsey Politte

Photo Taken By: Chelsey Politte

For my Networked Learning Project I struggled somewhat choosing just one thing that I wanted to learn.  After weighing my options, I knew wakeboarding in the middle of October may not be the wisest choice although entertaining for spectators, cooking would never work because I’d never be able to put my love of food aside long enough to decide on just one dish to prepare, and although there are plenty of YouTube videos and help forums regarding aviation online, I would never convince my dad to let me jump in the cockpit of his airplane (even though I could definitely argue the case of using it for educational purposes) without a pilot’s license.

Finally, I have decided to learn how to play “You Are My Sunshine” on the piano.  For as long as I can remember, I’ve always wanted to learn how to play the piano.  My inspiration regarding song choice for this as my Networked Learning Project was my late grandmother. It was one of her very favorite songs.  Her and my grandfather, along with the rest of my large extended family would sing “You Are My Sunshine” together all the time.  It was the last song we sang together before she passed away.  My grandparents, who were both born into musical families and who raised a musical family of their own, always encouraged me to sing.  I told them, however, that I got the short end of the stick when it came to musical ability.  It seemed as though I was destined to be musically gifted, but it was obvious that God ran out of musical talent when it came to my turn in the serving line.  My grandparents knew that was alright though, because I was gifted in other ways.  They still made comments like “We could always use an accompanist.  You could always learn to play the piano.  Chelsey, I bet you would make a great pianist.  You could play right along with the rest of us singing.”

Although I thoroughly enjoy listening to music and listening to my family sing as well, the extent of my musical abilities go no further than learning to read music in elementary music class and middle school band as I attempted to play the flute.  That attempt of which, turned out to be very short lived.  I always had learning to play the piano on my endless list of things to do, but never made time to enroll in lessons and discipline myself enough to attend them weekly.

With very little music experience, and absolutely zero experience with the piano, other than watching my younger sister’s recital performances, I have decided to learn at least one song, “You Are My Sunshine” and dedicate my final product to my grandparents, as well as checking a skill that I’ve always wanted to learn, off of that endless “to do” list that, before, served as my road block.

I’ve already found a variety of YouTube videos for teaching oneself how to play “You Are My Sunshine” ranging from easy to more difficult versions.  I’m anxious to sit down at the piano with my newly discovered knowledge and my iPad as my guide to begin learning to play!  Wish me luck!